As I’ve posted before, corresponding with the release of The Burning Crusade, I switched from Bongos to Bartender 3 for action bar modification. If you are looking for an action bar mod, and your needs are basic, or you’re just getting started playing around with bar modding, then I highly recommend Bartender 3 (BT3). In this post, I’ll give you an overview of how I setup the mod for my use and my thoughts on the mod itself.
Bartender Basics
So before we get started, let’s cover some Bartender basics. Bartender offers all the basics you are probably looking for in a bar mod, including:
- Full style control ( Alpha / Scale / Padding )
- Split up Bars into Rows
- Set the number of buttons per bar ( only 1 - 12 supported, for short bars )
- Dynamic Page Swapping for Stances ( on all Bars, by default enabled on Bar1 )
- Dynamic Page Swapping on Modifier Down ( Shift / Ctrl / Alt )
- Custom Styles included: Zoomed Buttons, Dreamlayout
- Integrated Cooldown Count and RedRange
- Self Casting using a modifier key, or Right Click on the button
Important Note 1: That third feature is important and may be an important consideration for you in deciding whether to use BT3 or not. While you can configure the number of buttons per bar from 1 - 12, you are limited to 10 action bars overall. Other mod give you virtually unlimited functionality on bars, BT3 does not. So if you need that level of functionality, you can stop reading. Personally, this hasn’t been a limitation for me and I believe is a contributing factor to BT3’s stability and lack of stance switching issues that I saw in other mods.
Important Note 2: Button key binding is controlled via the standard Key Bindings menu from the game interface. If you scroll down past the standard key bindings menu you will eventually find a BT3 keybindings menu. Find the bar you want to keybind, and assign keybindings just like you did for the standard action bars. Important: once you assign keybindings for a particular action bar, you have by default assigned keybindings for any other bar you will be switching to when switching forms. So, if you assign keybindings for Bar 2 and define a switch to Bar 3 when you go to Bear form, then there is no need to define keybindings for Bar 3. They will be the same as Bar 2.
Important Note 3: While BT3 can be used by any class, this overview is written from the perspective of a Druid. For us Druids, one of the main benefits is the ability to automatically switch action bars based on our various forms. I cannot speak with authority on what button paging options are available for other classes. However, my alt character is a Hunter and I can say that there are no button paging options for aspects.
My UI
So, just to get us started, here’s what my UI looks like:
 You can see my default action bar setup in the lower right-hand corner (click the image for a full size view). I have the Blizzard main menu at the bottom in case I need to get at my character, talents, etc. in a hurry or in while I’m in chat. Over on the right side of the screen, I have a vertical bar where I put my low- to medium-use buttons. Things like hearthstone, professions, food and drink, etc. Then underneath my form switch bar, I have one bar that is my catch-all bar. It’s my temporary holding area for actionable quest items I need to get at quick, and some other miscellaneous items. I don’t use a lot of macros currently, so between this bar and the vertical bar on the right, I’m pretty much set with just these two above and beyond my main action bars.
So, to see where we’re headed, here’s what my bars look like when I switch forms. Here’s my buttons in Bear form: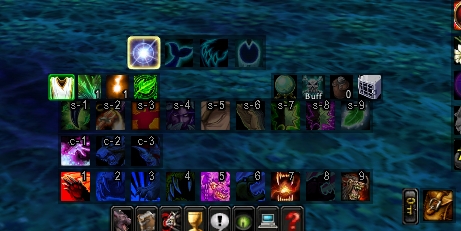
Here’s Cat form: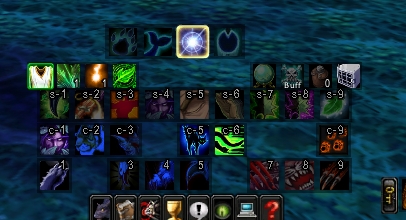
And here’s Cat Form - Prowl: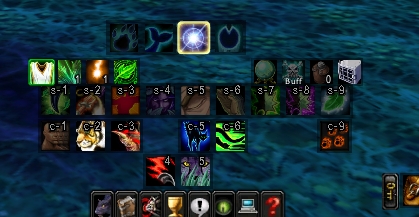
Planning your layout
“Hear me now, believe me later”- a little planning up front will help make your whole setup process go smoother; and it’s not that hard. Fire up World of Warcraft and get out a piece of paper. Now for each form you have (Caster, Bear, Cat, Tree of Life, Moonkin - dang we get to have a lot of fun), write down the buttons you currently have defined. Total the number of buttons you have for each form. Now here’s your first decision point. Given the bars you have to work with (10 total) and the number of buttons you have defined by form, work out a scheme for laying out your buttons.
If you’re not currently using an action bar mod and are pretty happy with your current layout, then you can forge ahead. When you install BT3, it draws upon your current button bar layout for to setup it’s initial configuration.
Myself, I wanted to change things a bit. I had seen a UI screenshot before where someone had three rows of Regrowth, Rejuv, and Healing Touch stacked together representing three different levels of each spell. I liked that layout and decided to implement it with BT3. So I knew at least in main Caster form, I was going to need 3 bars.
You’ll also notice in my UI that I only have 9 buttons per action bar. This was a decision on my part to try to scale down the amount of space my buttons took up on the screen. After adding up the number of buttons I needed in my animal forms, I found I needed two button bars per form. Once I threw in another bar for Prowl (even though I only needed two buttons), I found I was out of bars (2 miscellaneous bars, 3 in caster form, 2 in bear form, 2 in cat form and 1 for cat in prowl form).
I was okay with this, as I’m not button crazy and don’t need a lot of extra buttons. If you do, then either extend the length of your bars (up to 12 buttons) and/or combine more buttons on one bar. I easily could have freed up 2 or 3 more bars.
Install and configure BT3
Once you’ve got your action bar setup mapped out, you’re ready to install and configure Bartender 3. The install is just like any other mod. BT3 can be found on all the major download sites. I happen to like wowinterface.com.
Once you have the mod installed, it’s time to log into WoW and set it up. If you have multiple characters you may want to allocate BT3 just for the character you are going to setup. Your action bars are going to be all over the place until you configure them, so this way you won’t have to configure every single character you have all at once.
So now you’re ready to configure your action bars. Log in to the character whose bars you want to setup. Most likely, you’ll see a mess. Don’t worry, it’s not as bad as it looks. In fact, you should notice that your buttons are all pretty much in place, they just aren’t formatted very well. So let’s start by configuring your main (caster) bars.
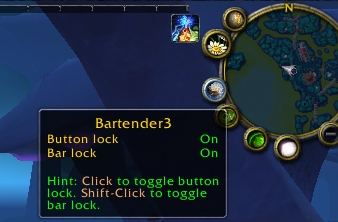 To configure your bars, you need to unlock them. To see your options, just hover the pointer over the icon. To unlock your bars, simplyShift+leftclick it the icon.
Once your bars are unlocked you can move them around and configure them. You might need to move some bars around to uncover bars underneath them. You’ll know which bar is which because there will be yellow “Bar x” text over each bar.
To access the action bar configuration menu, right-click any of your action bars to see the bar configuration menu.
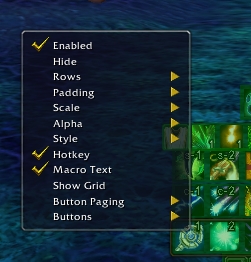 This is the action bar configuration menu. From here you can size your bars, set transparency, padding, etc. etc. Start here and get your main caster bars setup the way you want them. BT3 doesn’t have any automatic bar snapping or aligning, so you’re on your own to get your bars lined up the way you want.
The “Enabled” check mark controls whether the bar in question is active or not. The “Hide” option controls whether the bar is displayed by default. Your main caster bars should be set to Enabled and not hidden. All the bars for your alternate forms will be hidden so they only display when you switch forms.
You can use the Buttons option on the bottom of the menu to control how many action buttons are on this bar. You’ll also notice there is no vertical option. If you want a vertical bar (or a square group of action buttons), use the Rows option to increase the number of rows. A vertical bar of 12 buttons would have a Button setting of 12 and a Rows setting of 12.
I won’t go into the other options. You can play around with them yourself.
Okay, now that your main bars are all setup, let’s setup your automatic bar switching by form. Let’s start with Bear form. Your bars need to still be in unlocked mode.
Pick the action bar you want to turn into your first Bear form action bar. Right click on it to get the configuration menu. From here you simply press Button Paging / Stances / Bear Form. A little slider window will pop up. Move the slider so it indicates the number of the bar you want to switch to when you enter Bear form. That’s it! Pretty easy, huh?
From here, go on to setup your other Bear form bars (if you have more than one), and bar switching for all your other forms.
Now, if you didn’t do it before, go into the game menu’s Keybindings menu and scroll down until you find the Bartender 3 action bar section. From there, setup your keybindings as desired for your action bars. Remember, and this is important, only setup keybindings for your main display bars. You do not need to setup keybindings for any bar you switch to based on a form change. The new bar will have the keybindings of the original bar by default.
You may need or want to play with the individual action buttons on your bars. For me, the easiest way to do this was to wait until I have all my bars setup and form switching defined. Now just go form by form and move your buttons around. By default BT3 locks individual buttons so you can’t accidentally remove them. To move a button off it’s current slot, just press Shift and then click and move the button. This option can be turned off via the mini-map option. Just click to set the Button Lock option to Off. Personally, I leave this option on as I’m prone to those accidental deletions.
 So, once you’re all setup, you may have something that looks like this. You can see my main caster bars, and miscellaneous bars are green since they are the only ones not hidden. My alternate animal form bars are red as they are hidden. I have them all spread out so I can see them all at a glance in configuration mode and get at them separately.
What I like about Bartender 3
* It works! No keybinding issues, no form switching issues - it just works.
* Good flexibility and configuration options for laying out your action bars and buttons.
* Integration with FuBar. I use FuBar and I’m always annoyed that everything seems integrated with Titan but not FuBar.
* Some nice basic perks included - red out of range indication, cooldown count, self-casting modification, and the ability to turn off tooltips.
What bugs me about Bartender 3
* It’s strength is how basic it is, but some aids to help bar setup would be appreciated - like sticky bars and auto centering like I had in Bongos.
* The system to save different configuration profiles for multiple characters isn’t real easy to understand. I’m trying to get a handle on it and will post a follow-up once I have it figured out.
So there’s my long promised overview of Bartender 3. It’s a “must have” addon for me and I’m sure it will be for you too. I really did try to keep this overview to a reasonable length, but I wanted to make sure to give you benefit of my experience in setting it up. Please give me comments if I forgot anything and I will add to the post.
In case you missed the link above, you can download BT3 here.

No comments:
Post a Comment
Note: Only a member of this blog may post a comment.