Monday, July 28, 2008

Addons - OneBag

I downloaded OneBag a couple days ago. By the way, I’m linking addon references to wowinterface now. Yea, I’ve complained before about their search results, but I’ve figured that out. They just return every addon that mentions the addon you’re searching for. Makes some intuitive sense, but there doesn’t seem to be any relevance ranking, everything is just listed in alpha order. So the addon I’m looking for might be on the third page of results based solely on it’s spelling. Kind of dumb and I really hope they fix it because I like the site otherwise.

Anyway, I really like OneBag. It had some quirks during setup, but nothing too dramatic. It consolidates inventory management so anytime your bag opens (visiting a merchant, click it open yourself, visit bank, etc.) you see one consolidated interface presenting all the items (and open slots) in all your bags.

OneBag downloads with three supplements: OneRing, OneBank and OneView.

OneRing adds your keyring to your OneBag view. OneBank adds support for your consolidated bank view (including your extra bank slots). OneView is a mini-map button that you can click to open the mega-consolidated view (bank and inventory and keyring all from one window).

The add-on is well integrated and I haven’t found any occasion where OneBag didn’t open or present inventory properly. In fact, if you’re using any kind of unit frame add-on you could get rid of your on-screen bags altogether. I haven’t been that brave yet, but probably sometime in the future I will.

EDIT: With the integration of OneBag into your UI, clicking any of your bags will bring up OneBag. So if you’re not ready to delete all your bags off your screen you can definitely reduce down to just one bag. Clicking it will open OneBag. Also remember that Shift+B is the default UI command to open all bags (just in case something goes wrong).

Here’s a screenshot of the add-on in action. OneBag view of inventory Here’s a couple cool things that OneBag does when it presents your consolidated inventory. First, notice that some of the inventory slots have a colored aura. This is an option where you can highlight the inventory item with the color of it’s rarity. To see a sidebar of all your bags, just click the left-pointing arrow in the top left corner. If you click one of the bags, then all the inventory slots belonging to that bag are highlighted in white. Notice your keyring icon just to the left of “Amanna’s Bags”. Your menu gives you lots of useful options for how to display bags, and sizing and display options for the frame itself. You can control the scale of the window, the number of columns, the opacity, all colors and lots of other settings.

So this is what you see if you click one of your bags to open it, or when you talk to a vendor to buy something. If you’re at the bank, you get a similar window, just with only your bank contents.

OneBag remembers your bank inventory. This is useful for the OneView mini-map icon. Once you visit the bank you can click the OneView icon OneView mini-map icon and you’ll get a OneViewconsolidated inventory UI presenting both bank and bag inventory. Notice there are arrow buttons at the top of both your bank inventory and your bag inventory. Click either of these to hide the display of that particular inventory. Click again to expand the inventory. The Config Menu button brings up basically the same configuration screen as OneBag, this one just includes additional options for all bags. The Char Select button lets you choose which of your characters to see the OneView inventory of. Yes, this thing remembers all your characters. I figured that out when I was playing my level 25 Hunter and clicked OneView only to see Scourgestones and Scarabs. The current character name will always be at the top.

I had some mis-starts with this add-on. Some of the buttons didn’t to seem to work like they should. However, now that I have it setup and have played with it for a couple days, it works like a charm with absolutely no issues. This is one add-on that will most likely quickly become a “must have” for both of my characters.

What I like about OneBag
* One consolidated inventory window
* Lots of options to help visually manage your inventory (like the rarity color borders)
* Lots of control over how the window is displayed
* Includes bank and keyring
* Well-integrated into gameplay

What bugs me about OneBag
* Nit-picking here, but look to the left. In the OneView window, your starting backpack is not displayed. The items in it are, but it isn’t. May be my config issue, it just bothers me that it isn’t there.
* Unless it’s an option I haven’t found yet, my keyring doesn’t display in the OneView window.

All in all, OneBag is definitely recommended.

If inventory/bag/item enhancement mods are your thing, check out wowinterface’s Ace: Inventory/Item Enhancement (incl. bags/bank) category listing. Personally, about the only other thing there that I might try out is Fizzle for some durability numbers on my items in character view.

I’m slowly getting acclimated to Bongos, an action bar configuration tool. Once I get a little more up to speed, it will be my next featured add-on.

Saturday, July 19, 2008

Addons - Bongos

I’m going to write my long-promised overview of Bongos in two parts. Bongos is an action bar modification addon that gives you virtually complete control over your action bar setup. It is not tha only mod out there. It is the mod I selected because it offers fairly a good amount of action bar control, with fairly ease of setup. There are other mods out there offering more functionality, but from what I read they require much more setup and maintenance.

That being said, action bar modding is not for the faint of heart. After all, you are playing around with the very mechanism by which you tell your character and the game itself what you want it to do. The first time you install an action bar mod, login and see all your bars totally screwed up, it can be a bit unnerving. However, using a well-established tool like Bongos, and about 30 minutes or less of configuration time, you will be rewarded with a custom action bar setup, giving you:

  • More screen real estate to see the action
  • Better performance due to these addons being coded from the ground up to be more efficient than the standard WoW interface
  • An action bar setup customized to your playstyle
  • Automatic bar switching based on your current form (supports Caster, Bear, Cat, Aquatic, Moonkin/Tree of Life, Flight and Prowl)

In this first part, I plan on giving you the “real-world” overview of what you will be getting in to if you want to setup Bongos. One of my big complaints with Bongos used to be the lack of documentation on how to use it, and the relatively complexity of the addon, even though it was one of the simpler action bar mods out there.

Well, much of this got addressed in the latest release of the addon. Some overview documentation, although condensed, has been posted along with the addon on all the major UI download sites. Also, with the last release, the author has done I think a great job updating how Bongos is setup and configured to be much more understandable.

So in this post I want to do two things - give you a very overview of the basic concepts of Bongos and respond to the documentation posted on the UI sites with some real-world observations having setup and configured the mod.

Basic Concepts
Bongos gives you total control over 120 action buttons. You could create 120 one button action bars, 10 twelve button action bars or any other combination. On each action bar, you can control size, scale, button spacing, opacity and location.

Bongos downloads with the following modules:

  • Bongos - The core addon
  • Bongos_ActionBar - Breaks up the main action bar into movable parts
  • Bongos_Stats - A display for latency, framerate, and memory usage
  • Bongos_RollBar - Makes the frame for rolling on items movable
  • Bongos_CastBar - A movable casting bar, with the ability to show cast time
  • Bongos_XP - A movable experience/reputation bar
  • Bongos_MapBar - A customizable minimap
  • Bongos_Options - A dynamically loaded options menu for Bongos

So not only do you have complete control over your action bars, but you get access to some of the other bars as well.

Bongos also has the concept of “paging”. For each action bar, you can define which pageset it is part of up to 6 pages. Pages let you do things like define actions bars that only display for particular forms. So you can have an action bar for Cat that only shows when you are in Cat form.

The new release of Bongos also supports action bar “docking”. This allows you to drop one action bar on top of the other to dock the two bars. You can dock any number of bars together. The docking effect along with paging allow you to have different action bars show onscreen, in the same location, based on your various forms. The two effects together give you a lot of flexibitliy in what appears on your screen. You can also therefore have some action bars that stay on screen regardless of which form you are in.

Bongos Documentation and “Real-World” Comments
So here I’ll post the documentation that the mod author has posted on the UI sites. Most of it is self-explanatory and works. After the documentation, I’ll give some of my real-world comments based on my experiences with Bongos.

“General

  • To bring up the options menu, left click the Bongos mini map button, or type /bongos
  • To unlock bars, uncheck the lock bars option in the main options menu, or right click the mini map button
  • To hide or show a bar, unlock bars, then middle click or shift right click it.
  • To move a bar, unlock bars, and then click and drag it with the left mouse button.
  • To bring up a bar’s configuration menu, right click it

Key Bindings

  • Bindings for the Bongos action bar should only be done via the bindings menu in Bongos.
  • To bind keys, open the main options panel, and select the bindings option. Hover over a button, then press a key to bind it to that button

Action Bars

  • To access general action bar options, like enabling right click self cast, hiding hotkeys, or showing empty buttons, open up the main options window (/bongos or left click the mini map button), and select the action bars panel
  • To adjust the layout of a given bar, or reduce its size, unlock bars and right click the bar you want to adjust to bring up its configuration menu
  • Moving buttons: Hold down the key for moving buttons (shift by default), and drag a button. Alternatively, unlock button positions by shift right clicking the mini map button, or unchecking the option in the main options menu
  • Making a bar bigger: You can increase the maximum size of a given bar by reducing the number of action bars. To do so, adjust the action bars slider on the action bar panel of the main options menu. This option will reset the settings of your actionbars

Stances

  • Its possible to make a bar switch to another set of buttons using the stances panel in the Bongos Options menu.
  • To do so, open up the stances tab of the options menu. A list of current bar transitions will be displayed on the screen. Follow directions from there.

Paging

  • Enabling paging on a bar means that pressing the appropriate key binding (shift+1 to shift-6 by default) will cause a bar to switch to the next bar.
  • To enable paging, either right click a bar and check the paging option, or check the option for the bar via the paging menu
  • Its possible to adjust how many bars are jumped when paging by adjusting the skip option on the paging panel. The default is to skip 0 bars, meaning going to page 2 will go to the next bar, whereas setting skip to page 1 would shift up two bars.”

Okay, now that I read back through all this, only two real world comments:

  1. Pay close attention to the comment in red. If you go into the options panel and adjust the number of action bars, for example from 10 to 15 because you underestimated the number of action bars you needed, Bongos more or less completely throws out your bar configuration. Yea, most if not all of your buttons will have the action you place there still in place, but things like sizing, location, docking, etc. will need to be completely re-configured. This is really a hassle and I hope this is addressed in future releases.
  2. Basically ignore all the stuff in Stances and Paging. That applies to previous releases and is configured differently in the newest release.

In the next post, I’ll give you step by step instruction on how to setup Bongos to support your Druid forms. I’m using Bongos for both my Druid and Hunter so everything I tell you is applicable for other classes as well. Interestingly, Bongos doesn’t give you Hunter aspect options on action bar configuration menus, but you do get all Druid forms.

Of course, Burning Crusade is out in two days and I did pay for overnight shipping so don’t hold your breath on a detailed configuration guide for Bongos once I get my expansion disk. However, I will be taking some screen shots and hopefully posting pics of all the cool new gear I’ll be getting once step through the portal.

So parting shots on Bongos - if you’re looking for a performance boost and want some better control over your action bars, but don’t want to go crazy setting it up, Bongos may be what you’re looking for. It has some quirks, but from what I’m reading in the mod forums, most of the action bar mods do. You can always not load it and you’ll be back to your standard Blizzard bars. So, don’t be scared - give it a try.

Sunday, July 13, 2008

Addon - Bartender 3

As I’ve posted before, corresponding with the release of The Burning Crusade, I switched from Bongos to Bartender 3 for action bar modification. If you are looking for an action bar mod, and your needs are basic, or you’re just getting started playing around with bar modding, then I highly recommend Bartender 3 (BT3). In this post, I’ll give you an overview of how I setup the mod for my use and my thoughts on the mod itself.

Bartender Basics
So before we get started, let’s cover some Bartender basics. Bartender offers all the basics you are probably looking for in a bar mod, including:

  • Full style control ( Alpha / Scale / Padding )
  • Split up Bars into Rows
  • Set the number of buttons per bar ( only 1 - 12 supported, for short bars )
  • Dynamic Page Swapping for Stances ( on all Bars, by default enabled on Bar1 )
  • Dynamic Page Swapping on Modifier Down ( Shift / Ctrl / Alt )
  • Custom Styles included: Zoomed Buttons, Dreamlayout
  • Integrated Cooldown Count and RedRange
  • Self Casting using a modifier key, or Right Click on the button

Important Note 1: That third feature is important and may be an important consideration for you in deciding whether to use BT3 or not. While you can configure the number of buttons per bar from 1 - 12, you are limited to 10 action bars overall. Other mod give you virtually unlimited functionality on bars, BT3 does not. So if you need that level of functionality, you can stop reading. Personally, this hasn’t been a limitation for me and I believe is a contributing factor to BT3’s stability and lack of stance switching issues that I saw in other mods.

Important Note 2: Button key binding is controlled via the standard Key Bindings menu from the game interface. If you scroll down past the standard key bindings menu you will eventually find a BT3 keybindings menu. Find the bar you want to keybind, and assign keybindings just like you did for the standard action bars. Important: once you assign keybindings for a particular action bar, you have by default assigned keybindings for any other bar you will be switching to when switching forms. So, if you assign keybindings for Bar 2 and define a switch to Bar 3 when you go to Bear form, then there is no need to define keybindings for Bar 3. They will be the same as Bar 2.

Important Note 3: While BT3 can be used by any class, this overview is written from the perspective of a Druid. For us Druids, one of the main benefits is the ability to automatically switch action bars based on our various forms. I cannot speak with authority on what button paging options are available for other classes. However, my alt character is a Hunter and I can say that there are no button paging options for aspects.

My UI
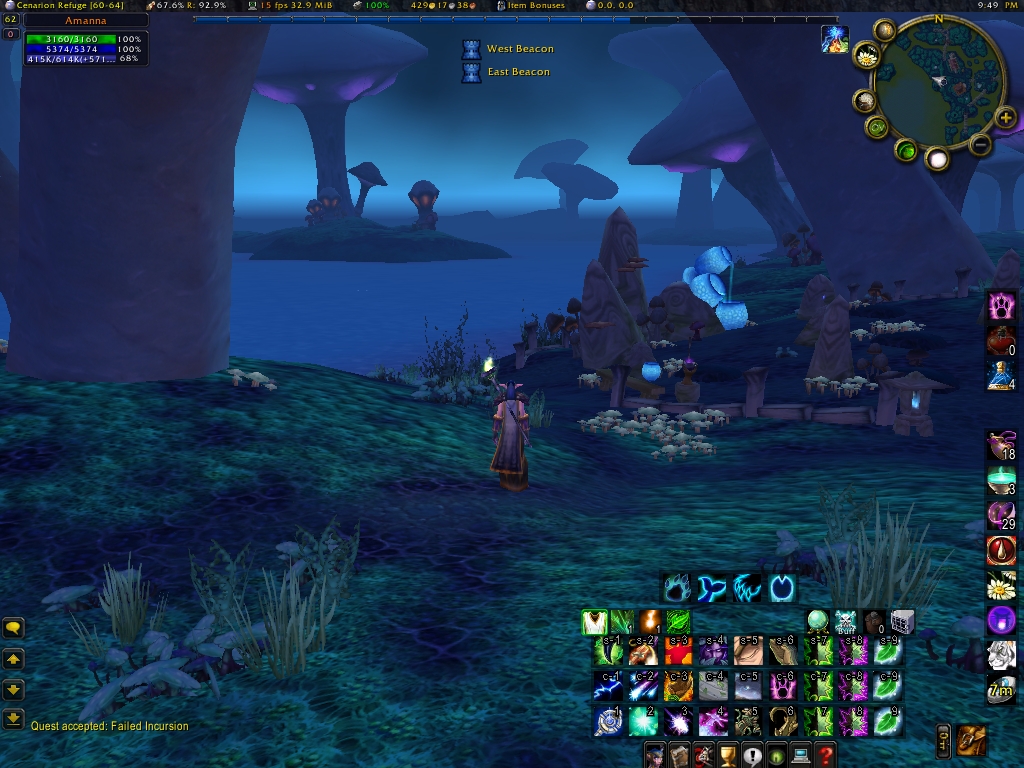
So, just to get us started, here’s what my UI looks like:

Main UI
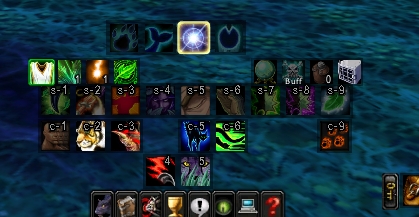
You can see my default action bar setup in the lower right-hand corner (click the image for a full size view). I have the Blizzard main menu at the bottom in case I need to get at my character, talents, etc. in a hurry or in while I’m in chat. Over on the right side of the screen, I have a vertical bar where I put my low- to medium-use buttons. Things like hearthstone, professions, food and drink, etc. Then underneath my form switch bar, I have one bar that is my catch-all bar. It’s my temporary holding area for actionable quest items I need to get at quick, and some other miscellaneous items. I don’t use a lot of macros currently, so between this bar and the vertical bar on the right, I’m pretty much set with just these two above and beyond my main action bars.

So, to see where we’re headed, here’s what my bars look like when I switch forms. Here’s my buttons in Bear form:
Bear Form Buttons

Here’s Cat form:
Cat Form Buttons

And here’s Cat Form - Prowl:
Cat Form Prowl Buttons

Planning your layout
“Hear me now, believe me later”- a little planning up front will help make your whole setup process go smoother; and it’s not that hard. Fire up World of Warcraft and get out a piece of paper. Now for each form you have (Caster, Bear, Cat, Tree of Life, Moonkin - dang we get to have a lot of fun), write down the buttons you currently have defined. Total the number of buttons you have for each form. Now here’s your first decision point. Given the bars you have to work with (10 total) and the number of buttons you have defined by form, work out a scheme for laying out your buttons.

If you’re not currently using an action bar mod and are pretty happy with your current layout, then you can forge ahead. When you install BT3, it draws upon your current button bar layout for to setup it’s initial configuration.

Myself, I wanted to change things a bit. I had seen a UI screenshot before where someone had three rows of Regrowth, Rejuv, and Healing Touch stacked together representing three different levels of each spell. I liked that layout and decided to implement it with BT3. So I knew at least in main Caster form, I was going to need 3 bars.

You’ll also notice in my UI that I only have 9 buttons per action bar. This was a decision on my part to try to scale down the amount of space my buttons took up on the screen. After adding up the number of buttons I needed in my animal forms, I found I needed two button bars per form. Once I threw in another bar for Prowl (even though I only needed two buttons), I found I was out of bars (2 miscellaneous bars, 3 in caster form, 2 in bear form, 2 in cat form and 1 for cat in prowl form).

I was okay with this, as I’m not button crazy and don’t need a lot of extra buttons. If you do, then either extend the length of your bars (up to 12 buttons) and/or combine more buttons on one bar. I easily could have freed up 2 or 3 more bars.

Install and configure BT3
Once you’ve got your action bar setup mapped out, you’re ready to install and configure Bartender 3. The install is just like any other mod. BT3 can be found on all the major download sites. I happen to like wowinterface.com.

Once you have the mod installed, it’s time to log into WoW and set it up. If you have multiple characters you may want to allocate BT3 just for the character you are going to setup. Your action bars are going to be all over the place until you configure them, so this way you won’t have to configure every single character you have all at once.

So now you’re ready to configure your action bars. Log in to the character whose bars you want to setup. Most likely, you’ll see a mess. Don’t worry, it’s not as bad as it looks. In fact, you should notice that your buttons are all pretty much in place, they just aren’t formatted very well. So let’s start by configuring your main (caster) bars.

Mini-Map icon options
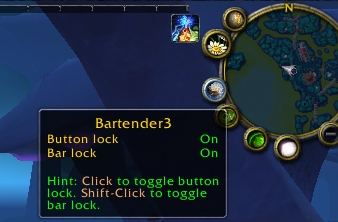
To configure your bars, you need to unlock them. To see your options, just hover the pointer over the icon. To unlock your bars, simplyShift+leftclick it the icon.

Once your bars are unlocked you can move them around and configure them. You might need to move some bars around to uncover bars underneath them. You’ll know which bar is which because there will be yellow “Bar x” text over each bar.

To access the action bar configuration menu, right-click any of your action bars to see the bar configuration menu.

Action Bar Options MenuThis is the action bar configuration menu. From here you can size your bars, set transparency, padding, etc. etc. Start here and get your main caster bars setup the way you want them. BT3 doesn’t have any automatic bar snapping or aligning, so you’re on your own to get your bars lined up the way you want.

The “Enabled” check mark controls whether the bar in question is active or not. The “Hide” option controls whether the bar is displayed by default. Your main caster bars should be set to Enabled and not hidden. All the bars for your alternate forms will be hidden so they only display when you switch forms.

You can use the Buttons option on the bottom of the menu to control how many action buttons are on this bar. You’ll also notice there is no vertical option. If you want a vertical bar (or a square group of action buttons), use the Rows option to increase the number of rows. A vertical bar of 12 buttons would have a Button setting of 12 and a Rows setting of 12.

I won’t go into the other options. You can play around with them yourself.

Okay, now that your main bars are all setup, let’s setup your automatic bar switching by form. Let’s start with Bear form. Your bars need to still be in unlocked mode.

Pick the action bar you want to turn into your first Bear form action bar. Right click on it to get the configuration menu. From here you simply press Button Paging / Stances / Bear Form. A little slider window will pop up. Move the slider so it indicates the number of the bar you want to switch to when you enter Bear form. That’s it! Pretty easy, huh?

From here, go on to setup your other Bear form bars (if you have more than one), and bar switching for all your other forms.

Now, if you didn’t do it before, go into the game menu’s Keybindings menu and scroll down until you find the Bartender 3 action bar section. From there, setup your keybindings as desired for your action bars. Remember, and this is important, only setup keybindings for your main display bars. You do not need to setup keybindings for any bar you switch to based on a form change. The new bar will have the keybindings of the original bar by default.

You may need or want to play with the individual action buttons on your bars. For me, the easiest way to do this was to wait until I have all my bars setup and form switching defined. Now just go form by form and move your buttons around. By default BT3 locks individual buttons so you can’t accidentally remove them. To move a button off it’s current slot, just press Shift and then click and move the button. This option can be turned off via the mini-map option. Just click to set the Button Lock option to Off. Personally, I leave this option on as I’m prone to those accidental deletions.

Bars setup and unlockedSo, once you’re all setup, you may have something that looks like this. You can see my main caster bars, and miscellaneous bars are green since they are the only ones not hidden. My alternate animal form bars are red as they are hidden. I have them all spread out so I can see them all at a glance in configuration mode and get at them separately.

What I like about Bartender 3
* It works! No keybinding issues, no form switching issues - it just works.
* Good flexibility and configuration options for laying out your action bars and buttons.
* Integration with FuBar. I use FuBar and I’m always annoyed that everything seems integrated with Titan but not FuBar.
* Some nice basic perks included - red out of range indication, cooldown count, self-casting modification, and the ability to turn off tooltips.

What bugs me about Bartender 3
* It’s strength is how basic it is, but some aids to help bar setup would be appreciated - like sticky bars and auto centering like I had in Bongos.
* The system to save different configuration profiles for multiple characters isn’t real easy to understand. I’m trying to get a handle on it and will post a follow-up once I have it figured out.

So there’s my long promised overview of Bartender 3. It’s a “must have” addon for me and I’m sure it will be for you too. I really did try to keep this overview to a reasonable length, but I wanted to make sure to give you benefit of my experience in setting it up. Please give me comments if I forgot anything and I will add to the post.

In case you missed the link above, you can download BT3 here.

Saturday, July 12, 2008

My thoughts about herbalism

So I didn’t post anything to this effect, like you’re interested anyway, but roughly the beginning of the week I left Hellfire Peninsula and headed into Zangamarsh. While my remaining HP quests were still yellow, I had completed a big majority of them and frankly I was ready for a change of scenery. Hellfire Peninsula, while a new zone, still looks very familiar to Blasted Lands. That, combined with my completion of most of the quests, a couple runs through Ramparts, and a low attention span and I was ready for a new zone.

So I dumped most of my remaining few quests and headed off to Zangamarsh. I picked up a bunch of quests at Cenarion Expedition and headed off southwest to the Feralfen area. I was pleased to see a new herb, Ragveil, and headed over to pick it. I couldn’t pick it yet though as my skill level wasn’t high enough. I did a quick check and Ragveil takes 325 Herbalism and I was only at 316. How could I be so low after a week+ of playing in Outland?

The more I thought about it, the more it made sense. With the rush of new players into Hellfire Peninsula, I hardly saw any herbs. Felweed is the one you see right away and almost as soon as a herb marker would show up on my mini-map (which wasn’t often), more than likely it was already picked by the time I could get there. I don’t think the re-spawn rates were too low, I just think there were a lot of flower pickers in the area.

Also, as I mentioned in an earlier post, I think profession levelling is progressing more slowly in the expansion than before. I’m skinning on average around 5 corpses, at orange level, before getting a profession increase. Maybe I wasn’t paying attention before, but that seems low.

So then I started to get a little mad, thinking “what do I do now”? Do I go back to an area where I’ve completed most of my quests to try to track down herbs that are getting picked almost as soon as they appear? Or do I stay where I am, not able to pick the herbs that I’m finding and have my herbalism lag behind my character advancement (since we know the higher level herbs are in the higher level zones).

Well, I pushed on and headed to Dead Mire. I knew from other blog entries that it was a skinner’s paradise and I had a couple quests for the area also. What intriqued me was a posting that said the main mobs in the area, they look like Bog Fiends, could be “picked” using your herbalism skill. So there’s my advancement path - I’ll kill two birds with one stone. Complete my quests and advance my herbalism skill.

This turned out to be another dead end. While you can pick the bog corpses, it does not appear to ever advance your skill level. (However, you can get some good loot of these guys. I was getting Mote of Life, Ragveil and Terocone consistently off them. With the number of people in the area killing these guys, I basically could have farmed all night if I wanted to. If you’re an herbalist (or skinner as there are Hydras there too) and are looking to farm items for recipies or to sell - this is a great location.

BUT - Like I said, it’s a profession levelling dead end. So I was really starting to think I would indeed have to head back into Hellfire Peninsula to up my skill level. I was headed back to Cenarion Expedition when all of a sudden Felweeds and Golden Sansams and Dreamfoils started to appear. Not a ton of them mind you, but enough that I was able to get herbalism up to 323, just 2 points away from the level needed for Ragveil.

I’m not sure if this area just cleared out a bit as it was getting late. I’m not sure if maybe Blizz upped some respawn rates. It was also suspicious that with the slow levelling I had been seeing, that I got two points off of Golden Sansam, which is green at my level. That seemed very lucky.

So whatever the reason - I’m more or less happy again. Just two more points and I can start picking Ragveil, which I’ve seen all over Zangamarsh. Plus at 315+ you can pick Dreaming Glory. I haven’t seen too much of it, but hopefully that will change. I think once I get to 325, I’ll be okay as the Ragveil is very plentiful in Zangamarsh.

So if you’re an Herbalist and having the same problem - stick it out. With some luck and maybe a late night session, you’ll be able to get your levels up without heading back to older zones.

Sunday, July 6, 2008

Early Outland instance gear

Okay gang, this is probably my last post until I start having some initial impressions of Outland and Burning Crusade.

Hellfire Citadel is a three wing instance with The Ramparts having mob levels of 60-62, so it should be doable immediately with a decent group of 60’s. The WoW Insider post has links to wowwiki overviews of all the bosses, including loot drops. Of course, it’s hard to know if the drops will stay the same once the expansion is live, what the drop percentages are, etc., etc. But there is some nice looking stuff in there if the shots are accurate.

The Ramparts has 4 bosses: Watchkeeper Gargolmar, Omor the Unscarred, Vazruden and Nazan. Click the links to go the the separate wowwiki pages and see the details. Here’s the Druid gear I’m looking at:

Watchkeeper Gargolmar

Bracers of Finesse

Omar the Unscarred

Crystalfire Staff Heartblood Prayer Beads

Vazruden

Band of Renewal Shifting Sash of Midnight

Nazan

MokNathal Clan Ring MokNathal Wildercloak

Sorcerers Band Ursols Claw

So, with just a quick stats summary, you come up with:

Caster form (Crystalfire Staff, Prayer Beads, Band of Renewal, Sorcerer’s Band) - +16 to Spell Crit rating, +67 to Damage/Healing spells, +78 to Stamina, +77 to Intellect, +4 mana per 5, +60 to healing spells and +12 to Spirit.

Melee forms (Bracers, Sash, Clan ring, Wildercloak, Claw) - +83 to attack power, +60 to agility, +99 to Stamina, 2 sockets, +35 to resilience, +28 to Spirit and +160 attack power in Druid forms.

I haven’t takent the time to compare these stats to other armor out there, but most of these would be a very nice upgrade for me. Considering all the beta reviews are saying that the Hellfire Citadels wings are only taking around 90 minutes or so to run through, I plan on doing many runs of the wing to track this equipment down. It’s all equippable at lvl 60 so I’ll be able to wear it right away.

The wowwiki pages also show loot drops at heroic difficulty for the bosses. Some very nice stuff there also, but you’ll need to be much higher level to open the difficulty and wear the armor.

There also appears to be more and more information showing up on the armor sets in the expansion. Over on wowhead you can click on Item Sets on the home page to get this overview page. Click the “Classes” column to sort by that. Druid sets start appearing on page 3 of the results. You can find information on a couple different armor sets from Burning Crusade. (I’m kind of starting to like wowhead).

The only downside I see? I’m still stuck with those dang Blademaster Leggings. When, WHEN, will I get a replacement???

See you all on the other side…